Set up Estura and ring your first sale
Seven clear steps take you from subscribing to your first scan. Follow them in order, or jump straight to the part you're on — you can be up and selling in well under an hour.
Not subscribed yet? Try the live demo first — no account, no card.
to your first sale
From subscribing to a printed receipt. Follow them in order, or jump straight to the part you're on.
typical setup time
Download it, activate in a moment, and start ringing — you can be selling the same day.
servers or rep visits
You install Estura yourself on any Windows PC. No back office, no technician, no waiting.
of offline grace
Activation checks in online once, then runs offline — a dropped connection never stops a sale.
The setup guide
From subscribed to selling, step by step
Work through them top to bottom, or use the jump links to pick up right where you left off.
Subscribe
Begin your subscription through the secure checkout. It's one flat price per till, billed monthly, with no contract — pay with any major card and your receipt lands in your inbox right away.
- One flat subscription per register — every feature included, no add-ons.
- No setup fee and no lock-in — cancel any time.
- Keep your own card terminal and bank — Estura never touches your processor.
After payment you're taken back to the activation page automatically — that's where your licence key appears, so don't close the tab.
Get your licence key
The moment your payment clears, Estura issues a product key for your store. We show it on the activation page and email a copy to the address you used at checkout, so you always have it to hand. It's one short key — just copy the whole thing exactly as it's shown.
- Shown on the activation page the instant your payment goes through.
- Emailed to your billing address as a backup — keep that email.
- Tied to your store — your store name comes through when you activate, filled in for you at setup.
Keep this key somewhere safe — you paste it into Estura once to activate this till. Misplaced it? Reopen your activation page or email [email protected] from your billing address.
Download & install Estura for Windows
Estura runs on any modern Windows PC. Download the installer, run it, and it sets itself up in a couple of minutes — no rep visit and no server to configure.
- Works on Windows 10 or 11 (64-bit).
- Grab the latest installer from our releases page and run it.
- A USB barcode scanner is recommended, but you can start without one.
Windows may show a "Windows protected your PC" notice for a new app. Choose More info → Run anyway to continue the install.
First-time setup
Open Estura on the till. On first launch it asks for your licence key — paste it in and Estura verifies it offline, in a moment. Your store name fills in automatically from the key, then a short wizard walks you through the rest.
- Paste your key into Settings → Subscription and click Activate.
- Your store name auto-fills from the key — just confirm it's right.
- Pick your province so GST / HST / PST is set correctly.
- Set your store details and default tax, then finish the wizard.
Activation checks in online, then runs offline with a 30-day grace window, quietly re-checking in the background whenever you're connected. A dropped connection or a billing hiccup never stops a sale.
Connect your receipt printer & cash drawer
Estura prints to Epson or Star receipt printers over USB and pops a standard cash drawer that's wired to the printer. Plug in, pick your printer, and run a test print.
- Connect the Epson TM-T20 (or a compatible ESC/POS printer) by USB and power it on.
- Plug the cash drawer's cable into the drawer port on the printer — the drawer opens through the printer.
- In Settings → Hardware, turn on the receipt printer, pick it and hit Print test.
- Open drawer fires the drawer once, so you can confirm it's wired right.
No printer yet? Estura still rings sales and can show an on-screen receipt — add the printer whenever it arrives and run the test then.
Set up the phone companion
The companion lets you watch sales, manage products and check on the store from your phone — even from home, over a secure link. Pairing takes one scan and a PIN.
- On the till, open Settings → Mobile access and choose Pair a phone.
- Scan the on-screen QR code with your phone's camera.
- Enter the PIN shown on the till to confirm it's you.
- Paired — now reach your store from anywhere over the secure link.
Each phone pairs once and gets its own secure device token. Lost a phone? Remove it from the till in Settings → Mobile access and it loses access instantly.
Ring your first sale
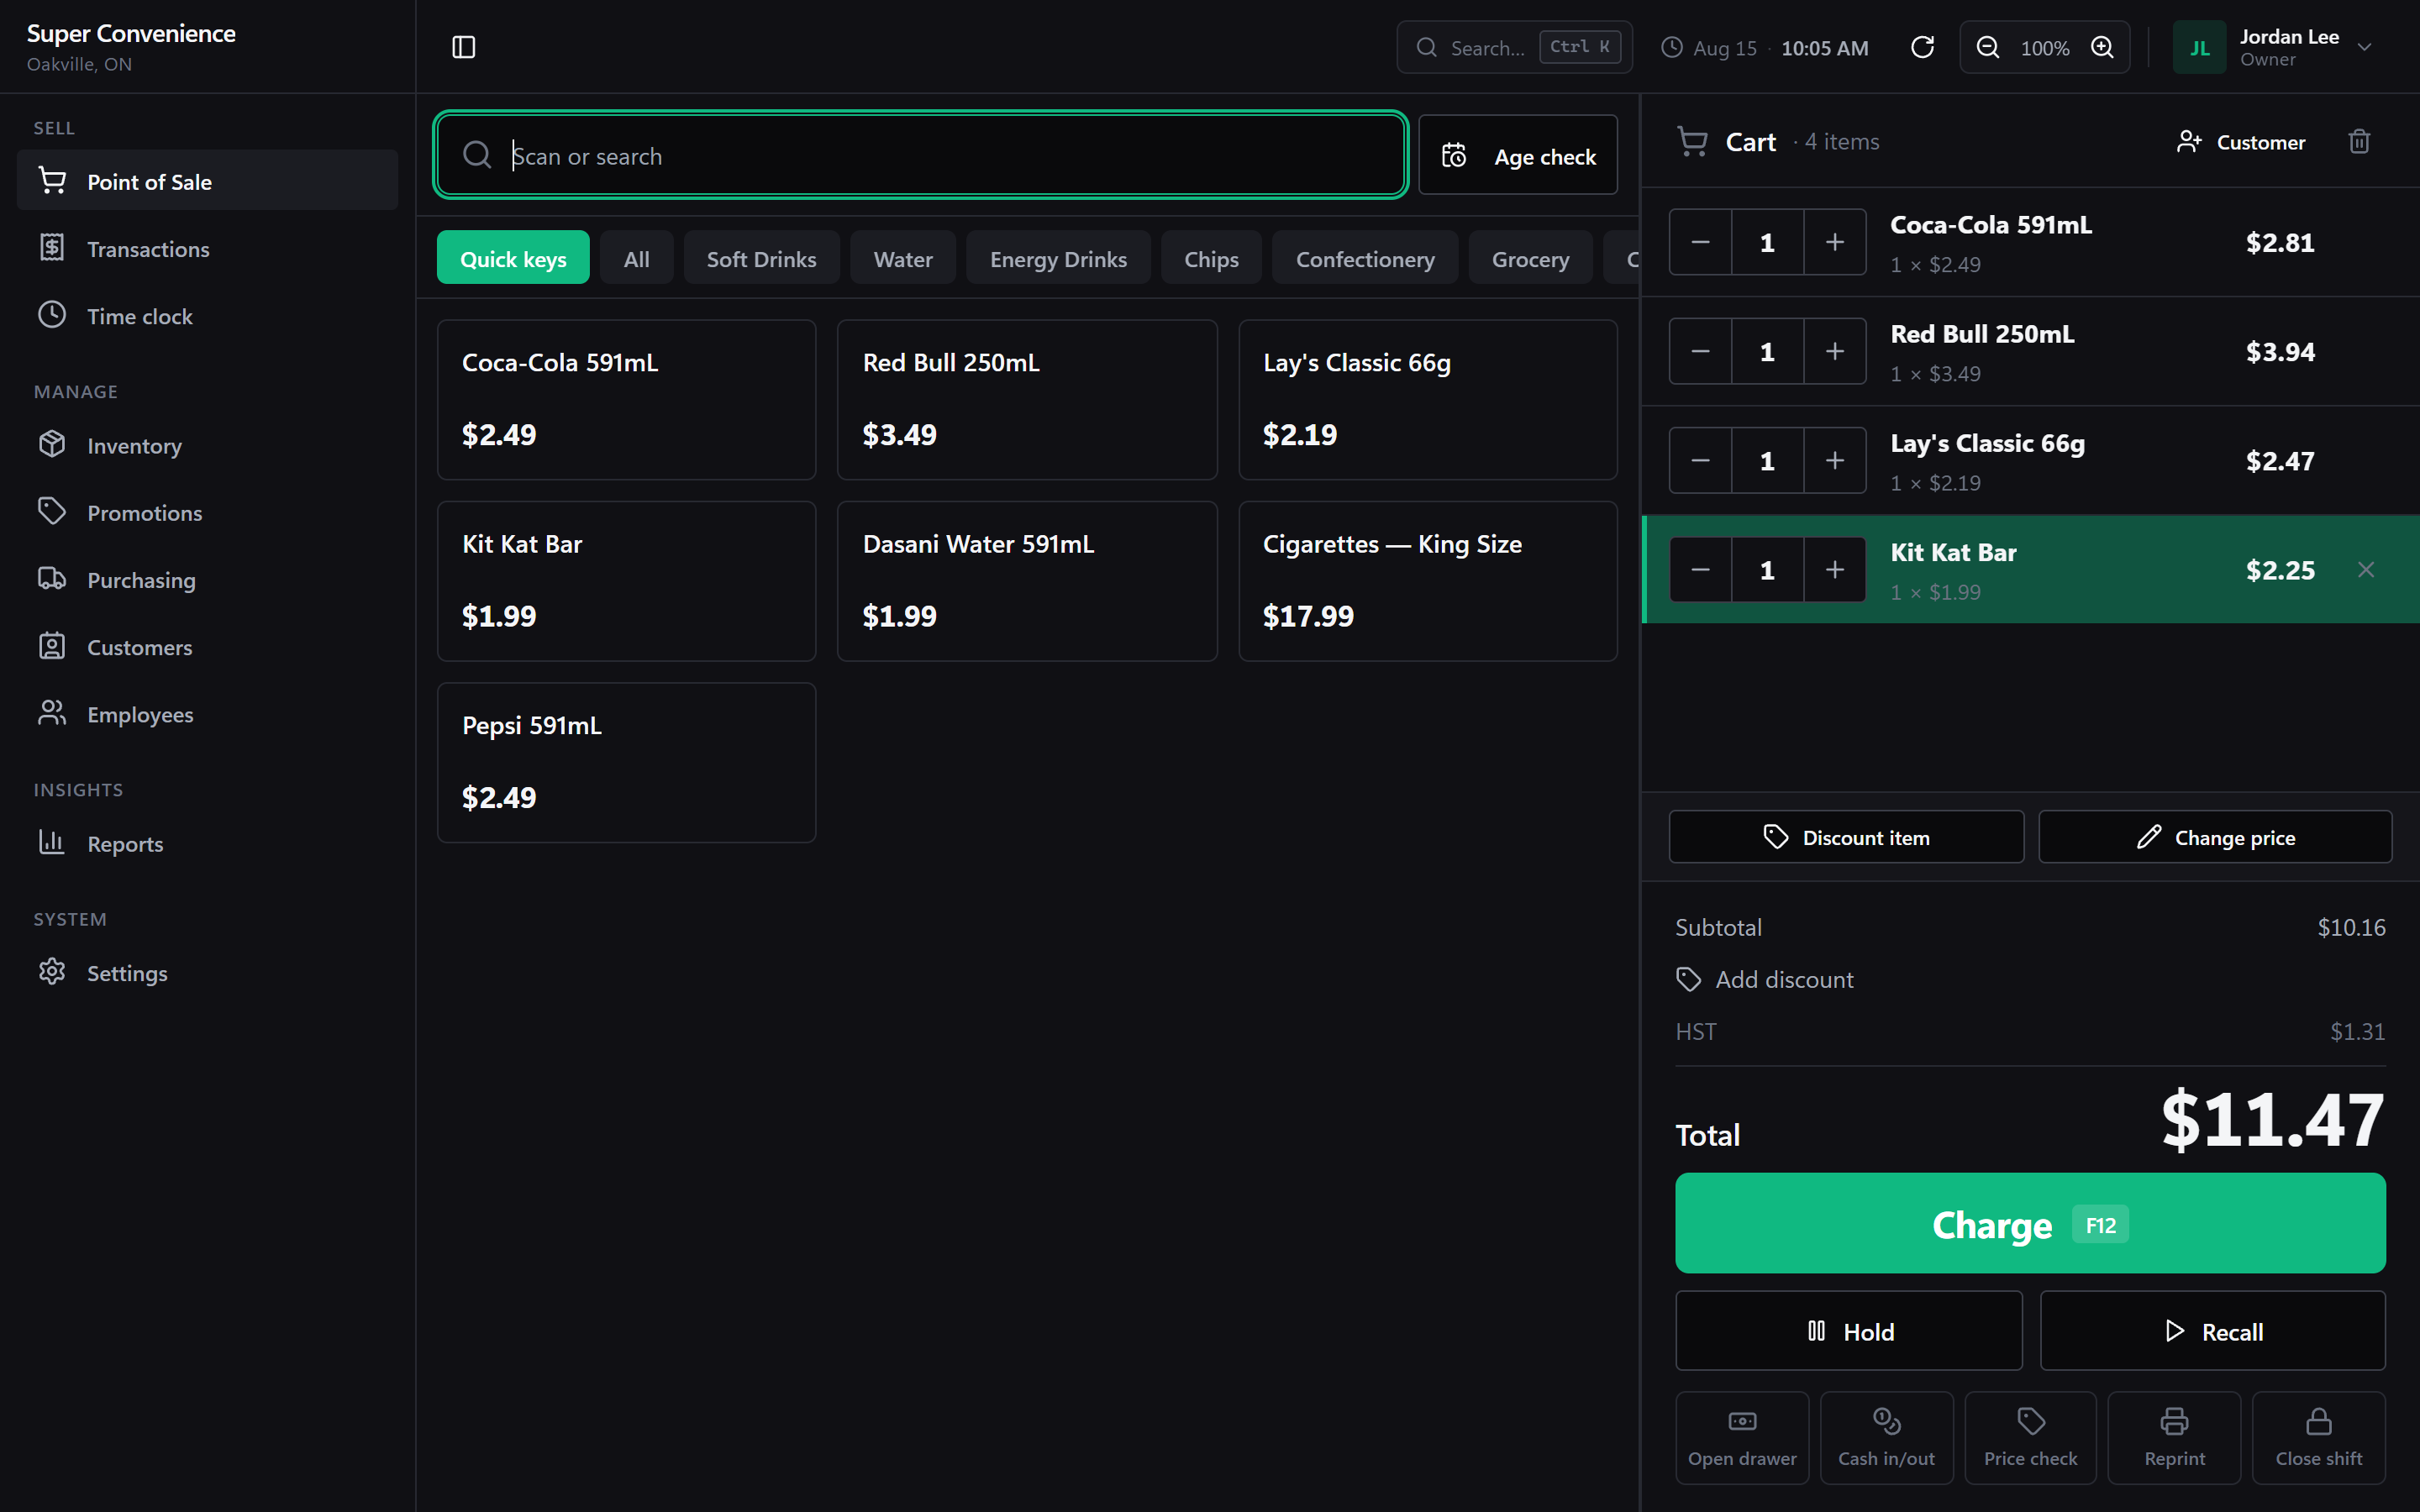
You're ready. Scan an item or tap it on the grid, take payment, and print. The total stays front and centre the whole way through.
- Scan a barcode or tap a product to add it to the cart.
- Adjust quantities — age-restricted items prompt the cashier to check ID.
- Press Charge (F12), pick how the customer's paying, and tender.
- The receipt prints and the drawer opens for cash — sale done.
That's a complete sale. Everything you just did keeps working with the internet down — the register never stops.
Everyday tasks
How to do the day-to-day
Short how-tos for the things you'll do most, with the exact buttons to tap. Already set up? This is your quick reference.
Checkout
Ring up a sale
- Scan a barcode — it drops straight into the Cart on the right.
- No barcode? Type the name in the Scan or search box and press Enter, or tap the item on the grid — or tap the Quick keys tab for your everyday sellers.
- To change how many, tap the number on the cart line (or press F2) and type the amount.
- Tap the green Charge button (or press F12) to take payment.
The Scan or search box needs to stay in focus for the scanner — if you tapped a button, just start scanning and it grabs focus back.
Take a split cash + card payment
- Tap Charge (F12) to open Take payment.
- Pick the first method — Cash (F1), Debit (F2) or Credit (F3) — and pay part of the total.
- The window shows Still owing and returns to the method list — pick another method for the rest.
- Once the whole amount is covered the sale finishes on its own; give any change shown.
A cash discount or card surcharge only applies when one method pays the whole bill — a split gets neither.
Sell an age-restricted item (tobacco, vape, lottery)
- Ring the item up as normal and tap Charge (F12).
- A Verify age window appears for the oldest age limit in the cart.
- Check the customer's ID against the age shown and confirm.
- Payment opens and you take payment as usual.
There's an age-cutoff date helper at the top of the till so you can see the born-before date at a glance.
Refund or void a sale
- Right after a sale, the receipt window has a Void option (a manager must be signed in). Enter the reason — the sale reverses and stock goes back.
- For an older sale, open the History screen and void or refund it there.
- Refunds are paid out in cash from the drawer.
Card refunds are done on your own card terminal, not in Estura — the same machine you take card payments on. Voiding a whole sale needs a manager signed in.
Open the drawer without a sale, or reprint a receipt
- In the cart's bottom toolbar, tap Open drawer (F3) — cashiers enter a Manager PIN and tap Authorize.
- To record cash added or removed, use Cash in/out beside it.
- To reprint, tap Reprint (F7) — it prints the last sale with a REPRINT banner.
The drawer opens through the receipt printer, so if it won't pop, check the printer is on and connected.
Products & inventory
Add a product
- Open Inventory and tap the green Add product button (top right).
- Type the Name, then type or scan the Barcode — tap Look up to auto-fill the name if you like.
- Pick a Category, enter the Price (and Cost, if you can see it — the margin shows underneath).
- Leave Apply tax on for taxable items; set an Age restriction for tobacco/alcohol if needed.
- Turn on Track inventory, set the Reorder point and Starting on hand, then tap Create product.
Adding and editing products needs the Manage products permission.
Give one product several barcodes
- Open the product from the Inventory list.
- Under Also scans as, tap Add barcode.
- Type or scan the extra code (e.g. a multipack or a re-labelled item).
- Tap Save changes.
Every code under "Also scans as" rings up this same product at the till.
Import your products from a spreadsheet (CSV)
- On the Inventory screen, tap Manage, then Import CSV.
- No file yet? Tap Download a template and fill it in — name and price are the only required columns.
- Tap Choose CSV file and pick your file.
- Review the Added / Skipped totals (skipped rows are listed with a reason), then tap Done.
Categories that don't exist yet are created automatically, and a bad row is skipped while the rest still import.
Pre-fill prices from your old register (Price Book)
- Tap Manage, then Scan to add products.
- First time only: tap Load list, choose your old register's export file, and check the Barcode and Price columns are mapped, then import.
- Scan an item — if it's in the list, the Price and tax fill in and the old name shows as a hint.
- Type the real product name, then tap Save & scan next and keep going.
The price list only fills in price and tax — the names stay yours to type.
Count stock with a scanner
- Tap Manage, then Stock count.
- Choose a Scope (all products or one category) and tap Start count.
- Scan each item — every scan adds one to its Counted figure; watch the Variance column (red = fewer than expected, green = more).
- Tap Apply count to adjust stock to your counts.
Nothing changes until you tap Apply count, and applying can't be undone.
Pin your top sellers to the Quick keys grid
- Tap Manage, then Quick keys.
- Type a product name or scan its barcode, then tap the result to pin it.
- Use the up/down arrows to set the order shown on the till.
Quick keys are the no-scan buttons cashiers tap for items they ring constantly — they show as a Quick keys tab on the till.
Purchasing & receiving
Add a supplier
- Open Purchasing and tap the Suppliers tab.
- Tap New supplier and type the Name (contact details are optional).
- Tap Save.
Create a purchase order
- On the Purchase orders tab, tap New order and pick the Supplier.
- Search or scan products to add them as lines, and set each line's Qty and Unit cost.
- Tap Save draft to finish later, or Place order when you send it.
You can only edit lines while it's a draft; placing the order is what lets you receive against it.
Receive stock as it arrives (scan-to-receive)
- Open the order you placed (its status is Ordered or Partial).
- Scan each item as it comes off the truck to count up the Receive amount (or type it by hand).
- Tap Receive items to add the stock to inventory.
Receiving part of an order sets it to Partial, so you can receive the rest later.
Reorder what's running low
- Tap the Reorder tab — the number beside it shows how many items are low.
- Products are grouped by supplier with the On hand, Reorder at and Suggested quantities.
- Tap Create order on a supplier's group to start a purchase order pre-filled with those items.
Suggestions only appear for products that have a reorder point set.
Employees
Add an employee and set their role and PIN
- Open Employees and tap Add employee.
- Type their Full name and a Username.
- Pick a Role — Cashier, Supervisor, Manager, Administrator or Owner (a line explains what each can do).
- Set a Sign-in PIN (4–8 digits) and tap Create employee.
Managing staff needs the Manage employees permission. To fine-tune one person's access, open them and tap Customize under Permissions.
Clock in and out
- Open Time clock — it opens on your own My time view.
- Tap the big Clock in button to start your shift; a live timer counts up.
- At the end, tap Clock out. Your finished shifts appear below.
Every employee can clock themselves in and out — no special permission needed.
Review the team's hours
- Open Time clock and tap the Team timesheet tab (managers only).
- Pick a period — Today, 7 days, 14 days or 30 days.
- Read hours per employee, with a total at the bottom.
- To fix a missed clock-out, tap the entry (or Add entry) and set the times.
Reset a PIN or lock an account
- Open Employees and tap the person's row.
- Tap Reset PIN, type a new PIN, and tap Apply reset.
- To change access without deleting them, use Activate, Deactivate or Lock.
Deleting an employee is permanent; locking or deactivating is the reversible option.
Reports & end of day
See today at a glance
- Tap Reports, then the Overview tab.
- Read Today's sales at the top, with the cash-vs-card split beneath.
- Check Payment mix, Top products and Low stock, and hit the refresh button any time.
Overview is a live snapshot of today. Profit shows once your products have costs entered.
Read an X report (without closing the day)
- Tap Reports, then Register, then Day close.
- The Current period section is your live X read — everything rung since the last close.
- Tap Print X for a copy. It changes nothing and resets nothing.
Close the day (Z report)
- Tap Reports, then Register, then Day close.
- Review the Current period figures, then tap Close day (Z #…).
- Confirm on the prompt — the Z prints automatically and lands in the Past Z reports list.
Closing the day is manager-only and can't be undone. Reprint any past Z from the list below.
Check per-cashier totals and cash over/short
- For the open day, see the By cashier card on Day close.
- For any date range, tap Reports → Staff → Cashiers and pick the period.
- For cash over/short, tap Reports → Register → Shifts and open a shift.
These reports are manager-only (the "View financial reports" permission).
Hardware
Connect and test your receipt printer
- Go to Settings → Hardware and, in the Receipt printer card, turn on Enable receipt printer.
- Set Connection to Windows / system printer for a USB printer.
- Leave Epson / ESC-POS selected, or pick Star (Star Line Mode) for a Star printer.
- Tap List printers, choose yours, then tap Print test.
Paper width, spacing and auto-print live in Settings → Receipts.
Test the cash drawer
- Go to Settings → Hardware and, in the Cash drawer card, turn on Enable cash drawer.
- Turn on Open automatically on cash sales if you want it to pop after each cash sale.
- Tap Test drawer — it should kick open.
The drawer plugs into the receipt printer, not the computer — so the printer must be connected first.
Connect a barcode scanner
- Plug the USB scanner in — most work right away.
- Go to Settings → Hardware and turn on Enable barcode scanner.
- Tap Test a scan and scan any item to confirm it reads.
Optional: turn on Camera scanning to add a camera button on the till for scanning with a webcam.
Turn on the customer display
- Connect a second monitor to the till.
- Go to Settings → Hardware and, in the Customer display card, turn on Show the customer display.
- Pick the right Monitor (tap Identify to flash it), and add an Idle greeting and Store logo if you like.
Set up automatic backups
- Go to Settings → Backups and turn on Daily automatic backup.
- Set an Off-site copy folder — point it at a OneDrive/Dropbox/Google Drive folder or a USB drive — then Save changes.
- Tap Back up now to make one immediately, and Check backups to confirm they're healthy.
Restoring a backup replaces all current data (a safety copy is taken first).
Troubleshooting
If something's not quite right
The three things stores ask about most. If a fix here doesn't sort it, a real person is one email away.
Estura won't activate my licence key
My receipt printer isn't found
I forgot my PIN
My scanner isn't reading barcodes
The internet's down — can I still sell?
Still stuck?
Talk to a real person
Email us and we'll help you get selling. Include your store name and what you were doing when it happened, so we can jump straight in.
Ready to open your till?
That's the whole setup — your first sale is usually within the hour. Stuck on any step? We're one email away.